Showing posts with label User Experience. Show all posts

Tuesday, September 24, 2019

Our Ortho-K journey: 9 months later...

The kiddo has been on the Ortho-K journey for about 9 months now and I thought that it would be great to update since the usage of these lens is now very much a part of her “lifestyle”.

If you need to have some background of what Ortho-K is about, I have previously done a post here.
But as a recap, Ortho-K is the usage of hard lens to reshape the cornea as the child wears it to sleep. This then reduces the need for glasses or contact lens during the day. 

But of course, to start off, the kiddo needed to go for a consultation to determine her suitability on the use of the lenses. 


Consultation to determine suitability

One of the most common questions that Dumpling gets from her classmates and me, from other mums are, what's needed / the steps involved. 

So here's what she goes through on a daily basis:


And off she goes to bed! 

When she wakes up, basically there are 3 steps: 

:: Step 1: Removal of lenses 
This is done with a small removal (suction) tool. Of course, when the kiddo first got her lenses, she "trialed" the removal and putting on under the watchful eyes of our consultants at eyesight.sg. I have to say that the staff there were super patient and very experienced in explaining, teaching and managing the kiddo's experience. 

They talked the kiddo through the steps slowly and very encouraging despite the fact that she was flustered in her first few attempts as it must have seem quite daunting to her to place the lenses into her eyes the first few times.


:: Cleaning of lenses
The steps involved in the cleansing were explained simply and the staff got the kiddo to demo to them too to ensure that there's no miscommunication. As hygiene is key to the success of this programme, I was really impressed with the detailed explanation and how the staff made it a point to highlight to the kiddo that it is her responsibility to maintain that hygiene. 


:: Soaking of lenses
And after the rinsing, it is off to soaking the lenses in another cleansing solution where it stays in the holder during the day. 


:: Overall experience
The kiddo's "degree" was about 150 to start off so I wanted to quickly manage / control the increase of the degree to a minimum when it was still on the "low" side. And because it was "low" to start off, her eyesight was tested to be perfect only after a few days of use.


(This was a momentous moment as we went on a family vacation in Dec, just 2 days after she started on Ortho-K. On the 4th morning, I still recall that she said to me "Mummy, I can see the ripples in the water! It's magical!") 

While there's "work" to be done in cleansing and soaking of the lenses plus regular eye checks, the pros far outweighs the "work". The kiddo has better "quality of life" because of better "quality of sight". It's now much safer for her to partake recreational netball


She's now able to enjoy her holidays where she can see well and do not have to cope with the hassle of wearing glasses... 

During March holidays in Penang

During June holidays in Ho Chi Minh City where she could take in the sights while on the back of a motorcycle during a local night tour!


Eyesight.sg
Addresses:
148 Potong Pasir Ave 1, #01-51 Singapore 350148
827 Tampines Street 81 #01-146 Singapore, 520827
Call or WhatsApp at (+65) 9824 1607
Operating hours: Monday to Sunday 11am-9pm

CALL FOR A NON-OBLIGATORY FREE CONSULTATION AND QUOTE "BEANIE "N" US" FOR $100 OFF YOUR ORTHO-K PACKAGE! 

Disclaimer: this is a series of collaboration as invited by Eyesight.sg so that Dumpling and I can share our reviews and experience on this new Ortho-K journey.

If you have enjoyed this post, please follow me on my Facebook Page where I share my parenting thoughts, food photos (be prepared for tons of them!), early shout outs for giveaways and interact with you, my readers! You can also follow me on Pinterest and Instagram!  

Thursday, December 5, 2013

User Experience: Baking and Grilling with the Philips Avance XL Airfryer

Having experienced the sweet success and simplicity of the Philips Avance XL Airfryer and overcoming my hesitation of using a new machine, I went on a cooking spree. Yup, a cooking spree that lasted for 2 days! From making Hainanese Pork Chop Rice to western meals such as Baked Fish Fillets, I was on a roll! I wanted to try out the technology on how this machine can fry, bake and grill too!

It is mainly due to its patented technology: fast and precise circulating air that mimicks frying AND its unique starfish design which cooks food evenly without turning. 

Along the way, I picked up some nifty tips. Now, if you have a small household like mine (with 4 members including our helper), these tips may be useful for you!


:: 1. You can bake with the Philips Avance XL Airfryer and this is not just limited to cakes!

Check out my baked white clams! It was perfectly done and was oh-so-delicious!!!! The clams were sweet and succulent having been baked in this divine butter-wine concoction. It was just all so Ooo-lala! (Pun intended - recipe shared further down in the post).


:: 2. Foil is my new best friend
Having a preschooler means that I prefer to eat healthy and would at times choose to bake / roast my food. I found out that foil is the way to go! I picked up this trick from some online recipes as well as reading up on some sharings by some really talented ladies in the I Love Philips AirFryer Facebook group.

From perfectly roasted potatoes:


To baked fish fillets:


My items were all moist and yummilicious! What you do is to place the items on the foil and then fold it up like a parcel. Put into the basket of the Philips Avance XL Airfryer and cook away. If in doubt, it is always good to start at a lower temperature. But as a general rule of thumb, 180 degrees is pretty good for most meat (including the fish fillets above).

:: 3. You can save time by baking and roasting in the same basket, at the same time! 
Say what? Yup, you read it correctly; you can bake and roast some food items at the same time! Here’s the proof!


How is that possible? It is simply because of the 50% larger capacity (1.2kg cooking capacity which feeds up to 5 people) which this new model sports! What I found out during my ‘experimentation’ was that I could bake and roast the potatoes all at the same time (see above photo)!!!

And both turned out beautifully done! How’s that for time saving? For a working mum like me, that’s superb news!  Check out my baked potato below! (Topping was baked separately with the Philips Avance XL Airfryer after the potato was done)


 :: 4. The Philips Avance XL Airfryer is wonderful for seafood!
One thing I found out is that the Philips Avance XL Airfryer is not just for frying meat. I have a love affair with seafood and I decided to try my hand over the weekend in preparing some seafood items. Besides the clams (1st photo above), I baked some crayfish too and look how it turned out! J Impressed yet?

I decided that in true Christmas spirit, I shall be generous in this post and share not 1 but 2 recipes!

These 2 recipes are great especially if you have friends over for Christmas dinners ~ not only are they yummy, they are really pretty awesome looking too!!! 

:: Recipe 1: Baked Butter Crayfish 


:: The Gathering List
  1. Half a kg of crayfish (half a kg yielded me 3 of them)
  2. Salted Butter (a small slab of 2 inch long x 1cm thick)
  3. 1 teaspoon of Garlic
  4. Salt
  5. Pepper
  6. Cream Cubes

:: The Cookout
  1. Pre-heat fryer to 180◦ for about 5 mins
  2. Wash and scrub the crayfish thoroughly and place it bottom side up in aluminium foil (see photo below)
  3. Dice up the butter and cream cube spread all over crayfish. Because I used salted butter, I used only 2 pinches of salt and sprinkled sparingly over the crayfish
  4. Sprinkle pepper (I used ground black pepper)
  5. Foil up the foil like a parcel and fold down sides. Ensure that all sides are sealed.
  6. Slide out drawer and place parcel in the basket.
  7. Bake on 190 degrees for about 20 mins. 


Were our crayfish “dried up”? In fact, in my humble opinion, because of the shells, it worked in favour for these crustacean as it trapped the moisture within. Check out the how moist the meat was! 

While the crayfish was baking, I quickly boiled some spaghetti and added some tomato spaghetti sauce to it. Here’s how our pretty our lunch looked! This would definitely be a great crowd pleaser for any Christmas gatherings! 


:: Recipe 2: Garlic Butter White Clams in Wine!

:: The Gathering List
  1. 1 kg of clams
  2. Salted Butter (a small slab of 2 inch long x 1cm thick)
  3. Diced Garlic (about 2 teaspoons)
  4. Diced Ginger (about 2 teaspoons)
  5. Salt
  6. Pepper
  7. Rice Wine
:: The Cookout
  1. Pre-heat fryer to 200◦ for about 5 mins
  2. Wash and scrub the clams thoroughly and placed it bottom side up in aluminum foil
  3. Diced up the butter, garlic and ginger and spread on the clams. As I used salted butter, I used only about 2 pinches of salt (similar to the crayfish) and sprinkle sparingly over the clams.
  4. Sprinkle pepper (I used ground black pepper)
  5. Start to fold up the sides of the aluminum like a tray and pour in the wine just before placing in the airfryer. Once wine is poured in, seal up all the sides immediately.
  6. Bake at 200 degrees for 14-15 mins. The clams should open up like below.
  7. Discard away any unopened clams.
Note: it is a personal preference regarding what wine to use. I have previously used a regular chardonnay which I felt tasted a tad “sharp”. Hence I have since used Chinese Rice Wine or you can substitute with beer instead.

There will be a pool of briny juice collected in the foil ‘tray’. Keep and put it aside. For myself, I ate the clams with freshly toasted French loaf dipped in a small serving of the juice.

For Dumpling, I prefer not to serve this to her typical vongole style (where it sits in the briny juice). But instead, I tossed the cooked pasta in a pan and on “high fire”, I poured in about 3 table spoons of the clam stock. I tossed it for a while longer to coat the pasta evenly and voila! 

This is definitely another crowd pleaser as it simply tastes amazing - it’s smooth because of the butter yet fragrant with the diced garlic and ginger. The wine adds on a lovely flavor to the whole dish too. Definitely something easy and doable for Christmas!

Disclaimer: I was invited to share my User Experience using Philips Avance XL Airfryer. All opinions and sharing I have given are mine and may differ from others. 

Cook with Air today! Quote Beanie N Us and buy the Viva Digital Airfryer at $399 (Usual price: $459), FREE $50 SHOPPING VOUCHER andAvance XL Airfryer at $479 (Usual price: $539), FREE $50 SHOPPING VOUCHER at the PHILIPS EXPERIENCE SHOWROOM. This promotion is valid from 1stDecember till 31st January 2014.

Limited to 1 Airfryer per person. IC must be produced.
PHILIPS EXPERIENCE SHOWROOM
Address: 620A Lorong 1 Toa Payoh Building TP4 Level 1 S(319762)
Tel: 6882 5800
Opening hours: Monday to Friday: 9.00 am – 7.00 pm Saturday: 9.00 am – 1.00 pm. Closed on Sundays and Public Holidays.

The Viva Digital Airfryer and Avance XL Airfryer are also available at regular prices in leading electronics stores, department stores and supermarkets island-wide.

If you have enjoyed this post, please follow me on my Facebook Page where I share my parenting thoughts, food photos (be prepared for tons of them!), early shout outs for giveaways and interact with you, my readers! You can also follow me on Pinterest and Instagram!

Monday, November 18, 2013

User Experience: Herb Roasted Chicken Drumsticks with Philips Avance XL AirFryer

I will be the first to own up that I am quite a dinosaur in the area of kitchen tools and aids. My 3-in-1 grill/oven/microwave has served me well for the past 7odd years and I have not gone around looking at new kitchen tools.


So I was a tad worried if I know how to use the Philips Avance XL Airfryer when I finally laid my hands on it. After opening it up and having a quick glance / look at the manual, my immediate thought was “So that’s it? Pop it in, set temperature and then the time?” LOL


Above: The Philips Avance XL Airfryer is a spunky looking kitchen tool with the stylish black and smooth lines. 

:: User Experience

Eating Healthy, the Air-fried way!
Being a noob at using this, I really wanted to try out a single meat item first. The entire concept of airfrying is truly exciting for me as eating healthier is definitely one of the things that I am concerned about when it comes to cooking for the family. Chicken is one of the regular items we cook at home so I decided to roast some drumsticks.


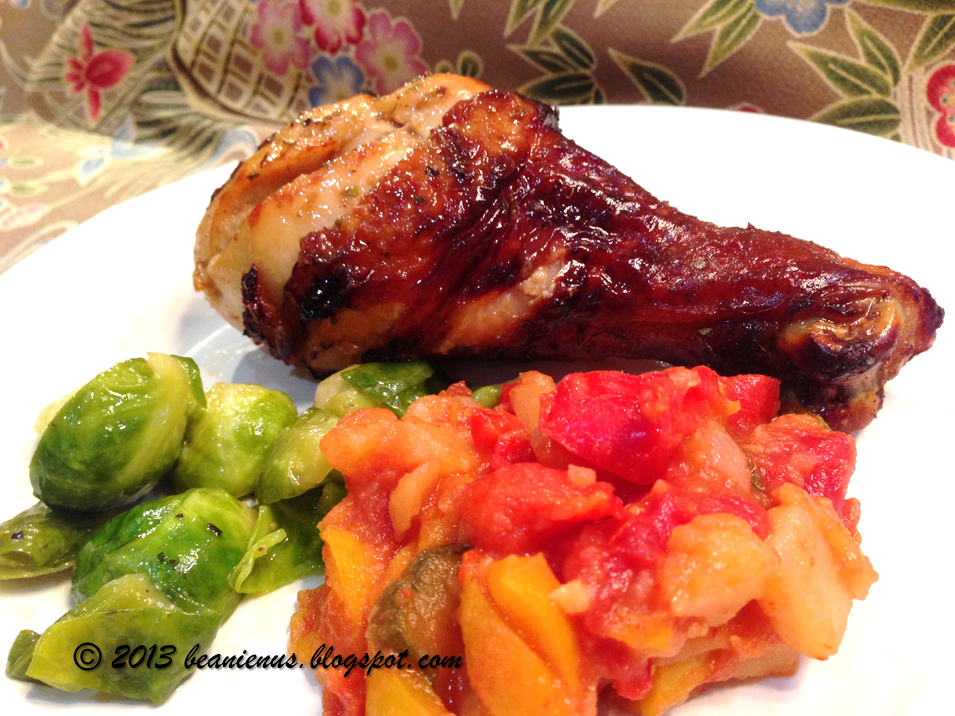
Here’s how they turned out:


Here’s a close up – can you see that there is no oil residue near / below the chicken pieces? I am certainly impressed at how healthy this cooking method is!


A quick look at the container below strainer shows very little oil. As I was lifting the pieces out of the strainer with a pair of tongs, I was pleased to hear the unmistakable crackling sound of a well-roasted chicken. The skin was crispy just like how it usually is when I use my oven.

Capacity
For this latest model, the Philips Avance XL Airfryer has 50% larger capacity. That worked beautifully for me as I could roast 4 drumsticks all at one go – perfect for my family size! This saves me much time as compared to having to roast them in 2 batches!

:: The taste test
Because we had marinated the chicken pieces for about 6 hours so the meat was flavorful. When it comes to cooking, I very rarely deep fry our dishes because I believe in healthy eating and I do not like it when the meat is too dry.

However, this was not the case with the Philips Avance XL Airfryer – check out how my chicken drumsticks turned out!


The meat was still flavourful yet still moist. An additional plus point which I like about using the Philips Avance XL Airfryer is that unlike deep frying where the herbs may float off, the herbs which I use for marinating stay on the chicken. This ensures that the taste from the herbs stays locked in. J   

Now, are you keen to try out my herb roasted chicken drumsticks? Here’s the recipe to share!

:: The Gathering List
1.  4 chicken drumsticks
2. Dried Mixed Herbs
3. 1 teaspoon of Chili Powder
4. 1 teaspoon Garlic Salt
5. Grounded Black Pepper
6. Lemon Juice
All of the items listed from 2 to 5 are from McCormicks

Optional: Red Wine Marinade


:: The Cookout 
1. Rub in Lemon Juice (I use around 2 teaspoons) and 2 table spoons of Red Wine Marinade
2. Sprinkle and rub garlic salt and a few dashes of black pepper to the chicken
3. Add a few dashes of herbs (according to taste)
4. Leave to marinade for at least 1 hour
5. Pre-heat fryer to 180◦ for about 5 mins
6. Add drumsticks to the basket
7. Roast on 200◦ for the first 10 mins and then 180◦ on another 5 

Served hot!


Disclaimer: I was invited to share my User Experience using Philips Avance XL Airfryer. All opinions and sharing I have given are mine and may differ from others. 

Cook with Air today! Quote Beanie N Us  and buy the Viva Digital Airfryer at $399 (Usual price: $459), FREE $50 SHOPPING VOUCHER andAvance XL Airfryer at $479 (Usual price: $539), FREE $50 SHOPPING VOUCHER at the PHILIPS EXPERIENCE SHOWROOM. This promotion is valid from 1stDecember till 31st January 2014.

Limited to 1 Airfryer per person. IC must be produced.
PHILIPS EXPERIENCE SHOWROOM
Address: 620A Lorong 1 Toa Payoh Building TP4 Level 1 S(319762)
Tel: 6882 5800
Opening hours: Monday to Friday: 9.00 am – 7.00 pm Saturday: 9.00 am – 1.00 pm. Closed on Sundays and Public Holidays.


The Viva Digital Airfryer and Avance XL Airfryer are also available at regular prices in leading electronics stores, department stores and supermarkets island-wide.

Wednesday, September 18, 2013

THE ADVENTURES OF ELASTI-CHICK IN REDMART.COM PART 2

Following our earlier instalment of Elasti-chick, here's issue 2 on how you, fab parents with super hero multi-tasking powers, can benefit from RedMart!
:: 3 reasons why shopping at RedMart is great
Friends often ask me how is it that I seem to have super hero powers: being a full-time working mum, homeschool after work, blog and that I find the time to cook too! Well, online shopping saves me much time and here; I share not 1 but 3 reasons on why shopping at RedMart is great!

:: 1 – eDMs inform me of the latest fantastic deals on RedMart!


With push email notifications (as below); I am prompted on great deals and the latest sale items! A quick tap on the email leads me to the website where I can scroll through the sale page easily and quickly.   


 :: 2 – Easy re-orders on RedMart with “My List”!


My previous orders are also saved in a “My List” function which is really convenient as I do not have to scroll through the categories again! All I have to do is to hit the “Add to Cart” button! 


:: 3 – RedMart has taken shopping to the next level – RedMart App!


Truly, how cool is that? The app is quick to download and simple and easy to use. Remember “My List” from point 2 above? It is also available in the app version! 


:: Variety

Now what about the variety? RedMart carries a wide array of items which I buy regularly and often, not at one place. I love Orangina and Starbucks coffee so it was a pleasant surprise to see that RedMart carrying both items. J


:: Ease of use

What I like about RedMart is also the ease of use – screens are big and sub-categories are clear with the drop down menus. 


:: CHECKING OUT- EASY PEASY, LEMON SQUEEZY!! 


And importantly, the checking out and payment are a breeze! For the month of September, RedMart is offering FREE DELIVERY for orders above $49 so what a better time than now to shop at RedMart? For BeanieNUs readers, I am pleased to share a 10% discount code!

All you need to do is to enter this discount code: rm_beanie to enjoy 10% off your first purchase!
So hop on over to RedMart.com now!

Disclaimer: I was invited to share my User Experience at RedMart. I have been compensated for this post. All opinions I have given are mine and may differ from others but my sharing is based on my personal usage and shopping experience at RedMart.com. 

Wednesday, July 17, 2013

THE ADVENTURES OF ELASTI-CHICK IN REDMART.COM

:: This is me, Mama Sue – aka ELASTI-CHICK.
Why? Because ever since I became a mum, I have suddenly developed super hero powers. The ability to be a mum who nurses all sniffles and coughs, a driver, a wife, an employee and most importantly, the ability to multi-task and mysteriously ensure that my child is well looked after as well as churning good and healthy food on the table.


:: This is Dumpling – aka GREEN, MEAN EATING MACHINE. 


Dumpling likes her food and pretty much likes it on time. Don’t muck around with her meals unless you want a meltdown.

And this is Dumpling at the mercy of Mother Nature where we are either being hit by the rain or (gasp), by the haze lately. So, what are we to do when the groceries run low?


:: Introducing Redmart.com
With my ELASTI-CHICK super hero powers, our groceries were sorted out!

Online shopping is my survival tip. I shop online for virtually anything because
(a) I hate crowds
(b) it saves me much time &
(c) it is virtually impossible to watch over an active preschooler AND shop.

Redmart.com is my secret grocery shopping address where I can beat the crowd, be dressed in my worst jammies and no one can see me (and get frightened by the 3-pound eye bags) and best of all, in the comfort of my own home. J

Can’t wait to find out more? Here’s a sneak peek at this secret address!!! 
(Click on image for an enlarged view!) 

To all of you fabulous parents with SUPER HERO MULTI TASKING POWERS!

HERE'S A 10% DISCOUNT CODE FOR YOU!

All you need to do is to enter this discount code: rm_beanie to enjoy 10% off your first purchase!
So hop on over to redmart.com now!  

JOIN ME AGAIN IN THE NEXT INSTALLMENT OF… 
THE NEW ADVENTURES OF ELASTI-CHICK!

Disclaimer: I was invited to share my User Experience at Redmart. I have been compensated for this post. All opinions I have given are mine and may differ from others but my sharing is based on my personal usage and shopping experience at redmart.com. 

Wednesday, July 10, 2013

A "NIVEA Body UV Whitening Serum with SPF 25" 14-Day Experience PART 2!

Before I embarked on this challenge, I always thought that it would be very troublesome to use any Bodycare products and that was one of the major deterrents for me. Coupled with the fact that I am highly sensitive to scents and I dislike any form of “residue” on my skin, that’s how I ended up not have much skincare regime. However, after taking on this “NIVEA Body UV Whitening Serum 14 Days Experience”, I can safely share that it required very minimal changing of lifestyle habits. Here’s sharing my experience.

:: Quick Absorption  
What I really like about NIVEA Body UV Whitening Serum with SPF 25 is the “ease of use” because of how quickly the lightweight serum is being absorbed into the skin. It is not thick or oily where I need to rub in for over a minute just to wait for the skin to absorb the serum. Additionally, there was also no feeling of “stickiness” once it dries off.

Here’s a “20 sec” demonstration to share:


I first squeezed out some serum (about the amount / size of a 20 cent coin) and I rubbed it onto my arm for 10 seconds (see centre photo). I then continued rubbing it in for another 10 seconds where you can see that the serum was totally absorbed. Hence, to get the serum on all my limbs is now a ‘less-than-2-minute’ job! So there is no major change in any lifestyle habits, just a 2 minute regime every time when I reapply the serum!

:: Moisturizing Effect
In my earlier post, I shared how dry the skin on my feet was with the years of neglect. During this 14 Days journey, I have been bringing the serum everywhere I headed to and have been applying religiously, sometimes even up to 5 – 6 times a day. This is because I work in an air-conditioned environment which dries out my skin totally.


After a week of usage, my skin was definitely less flakey and more hydrated. I cannot see so many lines on my foot (due to the dehydration of skin) now. The skin tone looks less dull (see centre photo). After 2 weeks, I cannot see any more flakey skin and the skin tone appears more even. I am very pleased that my feet definitely look ‘younger’! I guess that this has to do with the fact that the serum is infused with Hydra IQ and Red Seaweed which aids in a more supple skin.

:: Whitening Effect


Now, what about my arms? Being the family driver means that I am out in the morning chauffeuring my hubs and Dumpling to and fro before I eventually head off to work.


Over the weekends, I would also spend time by the pool while Dumpling has her afternoon swimming lessons and at times, I can see that my arms would get a bit burnt and turn red from the reflection of the harsh rays.

So I do like that the NIVEA Body UV Whitening Serum comes with SPF25 since I am outdoors quite a bit too as I now have a serum which offers daily sun protection and yet moisturizes well! 


Comparatively to before usage, there was a difference after 1 week where there seems to be a reduction of brown ‘patches’. After 2 weeks, my arms definitely look fairer and more radiant too. A quick look at the product information shows that the serum is enriched with Vitamin C from Camu Camu and as we know, Vitamin C is a powerful anti-oxidant which reduces melanin production (yay!) and hence my skin lightened over these 2 weeks.

I am very pleased with the improvements that I have seen in just 14 days. My skin has become more supple and definitely more radiant looking. I would recommend NIVEA Body UV Whitening Serum with SPF 25 to other mums, especially busy working mums like me who need an easy-to-use serum which delivers.

Disclaimer: This is an advertorial for NIVEA and is part of a series of “14 days experience” for NIVEA Body UV Whitening Serum SPF25. I have been compensated for this post. All opinions I have given are mine and may differ from others but my sharing is based on my personal usage and experience of the product. 
Related Posts Plugin for WordPress, Blogger...

Be warned: All content in this blog is copyright protected.

MyFreeCopyright.com Registered & Protected