Showing posts with label Recipes. Show all posts

Tuesday, April 14, 2020

Circuit Breaker & home-based learning: a week on...


I have been on a split team WFH basis since end February and like all, with the circuit breaker, I have since then transitioned to fully working from home. With the kiddo also doing full home-based learning, honestly it has been challenging.

While working (back to back con calls daily), I have to still attend to the kiddo’s IT problems, emotional needs (she is missing her friends and get grumpy as it is just worksheets and quizzes from period daily without much engagement) and we can’t go out of the house to do for e.g. some netball drills. 

So along the way, during this past week, I’ve learnt many things which would equip me better for the next circuit breaker / even an extension.

1. Top up top up!
I am not talking about food here (that’s below). The whole circuit breaker thing took most of us by surprise so while most are doing panic groceries shopping, I was mainly at home as I was trying to stay away from the crowd.

About a week into full HBL, my ink cartridge (the printer is new mind you!) ran out after printing out worksheets after worksheets from her enrichment classes. As it was new, I really had no inking as to how much ink would be used hence I was unprepared for this. And then just yesterday, the kiddo told me that some of her pens seem to be running low on ink too.

So that started my online hunt for more pens (Popular bookstore is closed!) and going on Shopee & Qoo10 to purchase new ink cartridges and pens. On this note, I have to say that I am very thankful we still have pencil leads!

2. Alternative groceries sources
After trying my luck and waiting for a slot at redmart for about 3 odd weeks, I finally had a delivery slot last evening. But as alternative sources, I’ve found that Singaporeans are very resourceful especially when it comes to our favourite national pastime – eating / food. I have a regular estate group buy chat group which I belong to where I've been ordering fruits to meat to seafood.  

However, there are 2 Facebook groups that I have just joined – Hawkers United which is basically set up where we can either pre-order in advance for quicker takeaways / for food delivery as well as Pasar United where anything from meat to seafood to fruits and vegetables can be ordered online / via whats app and then delivered to you.

Some of these sellers even have pre-packed bundles for our convenience

Image may contain: food

Image may contain: ‎food, ‎possible text that says '‎Set B: Seabass Seafood Set $50 nett 8ش‎'‎‎

3. Eyeballing
During the first week of HBL, I saw how restless my kid was. I am not sure if your children’s attention span is really good but for Dumpling, she has been missing her friends and social interaction. Additionally, for us, HBL has so far just been online attempts – quizzes and MCQs online + preprinted worksheets prepared by the teachers prior to the closure so this of course cannot be compared to frontal teaching. 

For the first 2 days, she was distracted and did not finish the exercises on time. As we had classes after the school’s HBL, it was really draining for me to nag (while working) and for her as well as we ended “school day” really late on those occasions.

So what I am still attempting to do is to get her to wind down at night as per the usual time so that she is up on time for her HBL. At the same time, I have shifted my “workstation” to her study area so that there’s some still some nagging and hand holding along the way.

4. One dish wonders for lunch
For lunch, as it is right smack in the middle of my work day, to be frank, I am unable to indulge and cook the usual soup and dishes (三菜一汤) but have gone into cooking noodles “zichar” style where all ingredients are in that 1 dish 


Image may contain: food


(More food photos and ideas are shared on my IG account! Please follow me and share your thoughts and ideas too)

as well as dishes which you can simmer over the stove – beef ribs stew yesterday.

Image may contain: food, possible text that says 'STAY HOME'
(Recipe link here)

So here's what I've learnt from the past week. What about you guys? How are you all holding up? I hope that the circuit breaker would help to flatten the curve and we can see the numbers decline in about 1.5 - 2 weeks time. Prayerfully, the worldwide situation improves soon too. Till the next post, please stay safe, and please stay home!   

 If you have enjoyed this post, please follow me on my Facebook Page where I share my parenting thoughts (both on the kiddo and my furkid), food photos (be prepared for tons of them!), outdoor fun, useful reviews, early shout outs for giveaways and interact with you, my readers! You can also follow me on Pinterest and Instagram!  


Friday, August 22, 2014

Foodie Friday - Crab Bee Hoon (Vermicelli)

For some strange reason I had really bad craving for something soupy mid of last week and I was dreaming and lusting over it so I headed out of my way to buy ingredients for Crab Bee Hoon soup!


:: The Gathering List

- Butter (I used about a quarter of the slab) 
- Spring Onion (I love spring onions and I basically used a whole packet which yielded me a plateful of it)
- 4 - 5 thin slices of old ginger
- 4 medium size flower crabs
- 2 packets of raw crab meat
- Half a head of Chinese Cabbage
- 1 packet of chicken stock (I used Swanson)
- 1 packet of Laksa Bee Hoon (Vermicelli)
- 1 can of evaporated milk (I used about 1/3)
- Fish sauce
- Hua Diao Jiu (Chinese Wine)
- 2 - 3 cups of Water

:: The cookout

- Melt the butter over a low flame and add on the sliced ginger, then spring onion, Chinese cabbage, then the crab meat and flower crabs.
- Cook over medium fire for about 5 mins (when you can see the crabs turned red)

- Add the packet of chicken stock & about 2 - 3 cups of water (do your taste test)
- Bring it to a slow boil
- In a different pot, boil water and add the Bee Hoon to the pot. Cook for 2 - 3 minutes till al dente. Drain it and rinse under tap water.
- Add about 1 - 2 tablespoons of fish sauce (to the soup)
- Optional: Add oyster sauce to enhance flavour
- Add evaporated milk and continue to bring it to a slow boil (to the soup)
- Add Hua Diao Jiu to taste (I love this so I added quite generously - about 3 - 4 soup spoonful of it)
- Add Bee Hoon to the wok / pot and cook over low heat for another 3 minutes
- Serve hot!


Linking up:


In the previous week, I shared a wholesome beef stew that usually has my family going for 'seconds'! Here's the recipe!
 
If you have enjoyed this post, please follow me on my Facebook Page where I share my parenting thoughts, food photos (be prepared for tons of them!), early shout outs for giveaways and interact with you, my readers! You can also follow me on Pinterest and Instagram! 

Friday, August 8, 2014

Foodie Friday - Beef Stew

Cooking is a small pleasure of mine because besides loving to eat, I cook to destress. Last week was a beef week for me as I was craving for red meat. Besides making 'homemade' patties, I cooked beef stew for the family. Here's the recipe to share (adapted from Jamie Oliver's recipe)

:: The Gathering List
- Butter (I used about a quarter of the slab) 
- 1 onion, peeled and chopped
- A dash of dried rosemary (I used McCormicks)
- 500g stewing beef, cut into 5cm pieces
- Worcester Sauce
- Ground black pepper (I used McCormicks)
- All purpose flour + Cornflour
- 2 - 3 carrots, peeled and cut into 4 to 5cm blocks
- 3 stalks of celery (sliced)
- 3 medium potatoes, cut into quarters 
- 1 packet of beef stock (I used Campbell, 500gm) 
- 1 quarter can of diced tomato cubes
- Optional: Tendons

:: The cookout
- Marinate the beef in advance with salt, ground black pepper and Worcester Sauce
- Melt the butter over a low flame and add on the chopped onions then celery, carrots and potatoes. Cook over low heat for about 5 mins
- At the same time, preheat your oven (20 mins on 160 degrees) 
- Coat the beef cubes with the flour mix and add to the casserole dish with all the vegetables. 
- Add tendons (if you have), turn up the flame to medium
- Add the diced tomato cubes and toss it with the rest for a while 
- Add the packet of beef stock
- Bring it to a slow boil. Add rosemary 
- Transfer the casserole dish to the oven. I set it at 170 degrees for 2 hours. 
- Serve hot with bread, mash potatoes or rice. 

Linking up:


I have previously shared a recipe on Chicken Stew with a slight variation. Here's the recipe to share.

If you have enjoyed this post, please follow me on my Facebook Page where I share my parenting thoughts, food photos (be prepared for tons of them!), early shout outs for giveaways and interact with you, my readers! You can also follow me on Pinterest and Instagram! 

Friday, April 25, 2014

Foodie Fridays - Korean Seafood Pancake

I love Korean food. I love the mesh of sour and spiciness. When a person mentions Korean food, most would think of Bibimbap or Kim Chi soup. For Dumpling and I, it's Korean pancake and bulgogi (for her) spicy beef soup (for me!)

The seafood pancake is one item that we would always order when dining at any Korean restaurant. So I decided to try and cook on our own. Here's our attempt ;)

:: The gathering list

As our version is seafood pancake so basically it can be any seafood items which you like:

Pancake
1) Scallops (chopped into bits)
2) Shrimps (chopped into bits)
3) Spring Onions (I chopped mine into about 1.5 - 2" long)
4) Korean Pancake mix (Check the instructions on the packaging - for mine it was to mix 500gm with 800 ml of water. I halved that for one pancake. If you are using a pancake mix, no egg is required.)
4) Cooking Oil (I used about 3 table spoons, If if is not enough, you can add more along the way)

Optional: I sometimes add in crabsticks (kani) and if the kiddo is not eating, slivers of sliced red chili (seeds removed)


(This is the pancake mix we used)

Dipping Sauce 
1) Vinegar
2) Light Soy Sauce
3) Water
(Mix equal parts of the above - i.e 1/3 of each)
Optional: chopped garlic added to the dip (Dumpling is not into garlic so we pretty much leave this out)

:: Hot Tips

I decided to add a photo of "what not to do" as above. LOL. This was one of my earlier attempts where I made 3 rookie mistakes. 

1) I did not use a FLAT pan (which resulted in a nightmare of attempting to flip the pancake over without the bits of seafood falling out)

2) I added WAY TOO MUCH of the ingredients where the flour mix could not bind the seafood as it was too 'thick'

3) The ingredients were cut a tad too big and took forever to cook.

:: The cookout
1) Add a generous amount of oil into your pan. As I am terrible with flipping the pancake over, I used the HappyCall Pan instead. So, what I did was also to spread a bit of oil on the top 'lid' too.

2) Pour in enough pancake mix where it covers the entire base with a bit of 'batter' to spare and then add in your seafood and spring onions. Sprinkle them evenly.

3) Press down the seafood into the batter and wait till the bottom is browned. The trick is to cook initially on "high fire". This process takes quite long for me - to press and hold and yet wait for the seafood to cook. So please cut your seafood into smaller bits and add sparingly. I know of some people who will toss the seafood separately prior and you can do that too - it helps to shorten the cooking time.

4) When the bottom is browned and the seafood is cooked, add another thin layer of the pancake mix over the seafood and then close your HappyCall Pan 'lid' and flip the pancake over. Open up the lid and press down the pancake.

5) Prepare the dip. Cut pancake into sections and serve hot. :) (Dumpling likes the flour part because she likes the chewy feel. If you prefer the crispy version like me, diced up your ingredients to small bits and spread them out sparingly; this allows you to cook faster and coat better, making it flatter and crispier)


  If you have enjoyed this post, please follow me on my Facebook Page where I share my parenting thoughts, food photos (be prepared for tons of them!), early shout outs for giveaways and interact with you, my readers! You can also follow me on Pinterest and Instagram! 

Friday, March 28, 2014

Foodie Friday - Inspired "Bulgogi Style" Beef with AirFryer!

I have not had a chance to cook over the weekends as much as I liked due to crazy schedules for the past 3 - 4 weeks! Oh, and how I have missed cooking!

At my very first chance, I took out my AirFryer and decided to cook a simple inspired 'bulgogi style' beef. You can do this with or without the foil but as I was cooking this for Dumpling, we went with foil simply because she prefers it with some 'gravy'. If you prefer the smoky BBQ taste, then please skip the foil, lower the heat to 180 and cook for a shorter period of time (I recommend checking after 6 mins)

:: Gathering List
- 200 gm of thinly sliced beef
- Half a packet of Eoki mushrooms
- Half a yellow onion, sliced
- Beef Bulgogi marinade


:: The Cookout
1. Marinate it with the marinade (coat the beef well) and let it sit in the fridge (I sealed the bowl with clear cellophane) for about 4 hours
2. Chop off ends of the Enoki Mushrooms
3. Mixed sliced onions with item (1) and placed them on a foil
4. Sprinkle the mushrooms above the beef
5. Wrap parcel
6. Cook on 190 degrees for 7 mins if you like it tender or 8 if you like it more chewy.


This is quite a simple meal to prepare and a tasty one which Dumpling enjoys. Try it and let me know how it goes! :)


On a different note, when it comes to meal planning, I try to be very organised and I recently made my own meal planner just to help me along. Here's the link to download this simple self made plan which I hope is useful for you too!


If you have enjoyed this post, please follow me on my Facebook Page where I share my parenting thoughts, food photos (be prepared for tons of them!), early shout outs for giveaways and interact with you, my readers! You can also follow me on Pinterest and Instagram! 

Friday, December 13, 2013

Baked Chilean Cod

I am still in love with my Philips Avance XL Air Fryer where I use it at every turn when I can, as I cook and prepare meals over the weekend. I do not know about your kiddos but Dumpling does not like Salmon. She finds the smell a tad too strong. However, she likes cod so that makes things a tad easier!

I like cod fish because it is full of Omega 3 acids + it is easy to cook. With the Philips Avance XL Air Fryer, it is almost where I now have an additional 'stove' - while the potatoes are boiling on the gas stove and I am preparing the grilled vegetables, the cod is being 'baked' in the AirFryer! :) Here's sharing this simple and healthy 25 min recipe below!


Preparation time: 5 - 7 mins
Cooking time: 15 - 18 mins

:: Gathering List
1. 1 packet of Chilean cod steaks (I used about 4 pieces for the kiddo and myself)
2. Italian Herbs
3. Salted Butter - 2 pieces of 1" x 1" cut into small cubes (as above)
4. Grounded Black Pepper
5. Lemon Juice

:: The Cookout
1. Wash and place the cod steaks in foil and dab dry with paper towels
2. Add a few dashes of grounded black pepper
3. Add Italian herbs sparingly (coat it well and spread evenly)
4. I used about 2 tea spoons of lemon juice and drizzled over the cod steaks
5. Fold up the aluminum sheet like a parcel; seal up the edges well
6. Place it in the basket of the AirFryer and bake on 180 degrees for 15 - 18 minutes. For our case, because our fish was a tad more than an inch thick, it took about 17-18 minutes so you would have to adjust the timing accordingly and check after 14 minutes. :)

Serve on a bed of mash potatoes and grilled vegetables for a healthy balanced diet! No added oil and all 'air baked'! Now, isn't this a pretty looking meal?


Previously, I shared 2 yummilicious recipes on baked crayfish and garlic butter wine clams which are really great for the festive season too!

If you have enjoyed this post, please follow me on my Facebook Page where I share my parenting thoughts, food photos (be prepared for tons of them!), early shout outs for giveaways and interact with you, my readers! You can also follow me on Pinterest and Instagram!

Thursday, December 5, 2013

User Experience: Baking and Grilling with the Philips Avance XL Airfryer

Having experienced the sweet success and simplicity of the Philips Avance XL Airfryer and overcoming my hesitation of using a new machine, I went on a cooking spree. Yup, a cooking spree that lasted for 2 days! From making Hainanese Pork Chop Rice to western meals such as Baked Fish Fillets, I was on a roll! I wanted to try out the technology on how this machine can fry, bake and grill too!

It is mainly due to its patented technology: fast and precise circulating air that mimicks frying AND its unique starfish design which cooks food evenly without turning. 

Along the way, I picked up some nifty tips. Now, if you have a small household like mine (with 4 members including our helper), these tips may be useful for you!


:: 1. You can bake with the Philips Avance XL Airfryer and this is not just limited to cakes!

Check out my baked white clams! It was perfectly done and was oh-so-delicious!!!! The clams were sweet and succulent having been baked in this divine butter-wine concoction. It was just all so Ooo-lala! (Pun intended - recipe shared further down in the post).


:: 2. Foil is my new best friend
Having a preschooler means that I prefer to eat healthy and would at times choose to bake / roast my food. I found out that foil is the way to go! I picked up this trick from some online recipes as well as reading up on some sharings by some really talented ladies in the I Love Philips AirFryer Facebook group.

From perfectly roasted potatoes:


To baked fish fillets:


My items were all moist and yummilicious! What you do is to place the items on the foil and then fold it up like a parcel. Put into the basket of the Philips Avance XL Airfryer and cook away. If in doubt, it is always good to start at a lower temperature. But as a general rule of thumb, 180 degrees is pretty good for most meat (including the fish fillets above).

:: 3. You can save time by baking and roasting in the same basket, at the same time! 
Say what? Yup, you read it correctly; you can bake and roast some food items at the same time! Here’s the proof!


How is that possible? It is simply because of the 50% larger capacity (1.2kg cooking capacity which feeds up to 5 people) which this new model sports! What I found out during my ‘experimentation’ was that I could bake and roast the potatoes all at the same time (see above photo)!!!

And both turned out beautifully done! How’s that for time saving? For a working mum like me, that’s superb news!  Check out my baked potato below! (Topping was baked separately with the Philips Avance XL Airfryer after the potato was done)


 :: 4. The Philips Avance XL Airfryer is wonderful for seafood!
One thing I found out is that the Philips Avance XL Airfryer is not just for frying meat. I have a love affair with seafood and I decided to try my hand over the weekend in preparing some seafood items. Besides the clams (1st photo above), I baked some crayfish too and look how it turned out! J Impressed yet?

I decided that in true Christmas spirit, I shall be generous in this post and share not 1 but 2 recipes!

These 2 recipes are great especially if you have friends over for Christmas dinners ~ not only are they yummy, they are really pretty awesome looking too!!! 

:: Recipe 1: Baked Butter Crayfish 


:: The Gathering List
  1. Half a kg of crayfish (half a kg yielded me 3 of them)
  2. Salted Butter (a small slab of 2 inch long x 1cm thick)
  3. 1 teaspoon of Garlic
  4. Salt
  5. Pepper
  6. Cream Cubes

:: The Cookout
  1. Pre-heat fryer to 180◦ for about 5 mins
  2. Wash and scrub the crayfish thoroughly and place it bottom side up in aluminium foil (see photo below)
  3. Dice up the butter and cream cube spread all over crayfish. Because I used salted butter, I used only 2 pinches of salt and sprinkled sparingly over the crayfish
  4. Sprinkle pepper (I used ground black pepper)
  5. Foil up the foil like a parcel and fold down sides. Ensure that all sides are sealed.
  6. Slide out drawer and place parcel in the basket.
  7. Bake on 190 degrees for about 20 mins. 


Were our crayfish “dried up”? In fact, in my humble opinion, because of the shells, it worked in favour for these crustacean as it trapped the moisture within. Check out the how moist the meat was! 

While the crayfish was baking, I quickly boiled some spaghetti and added some tomato spaghetti sauce to it. Here’s how our pretty our lunch looked! This would definitely be a great crowd pleaser for any Christmas gatherings! 


:: Recipe 2: Garlic Butter White Clams in Wine!

:: The Gathering List
  1. 1 kg of clams
  2. Salted Butter (a small slab of 2 inch long x 1cm thick)
  3. Diced Garlic (about 2 teaspoons)
  4. Diced Ginger (about 2 teaspoons)
  5. Salt
  6. Pepper
  7. Rice Wine
:: The Cookout
  1. Pre-heat fryer to 200◦ for about 5 mins
  2. Wash and scrub the clams thoroughly and placed it bottom side up in aluminum foil
  3. Diced up the butter, garlic and ginger and spread on the clams. As I used salted butter, I used only about 2 pinches of salt (similar to the crayfish) and sprinkle sparingly over the clams.
  4. Sprinkle pepper (I used ground black pepper)
  5. Start to fold up the sides of the aluminum like a tray and pour in the wine just before placing in the airfryer. Once wine is poured in, seal up all the sides immediately.
  6. Bake at 200 degrees for 14-15 mins. The clams should open up like below.
  7. Discard away any unopened clams.
Note: it is a personal preference regarding what wine to use. I have previously used a regular chardonnay which I felt tasted a tad “sharp”. Hence I have since used Chinese Rice Wine or you can substitute with beer instead.

There will be a pool of briny juice collected in the foil ‘tray’. Keep and put it aside. For myself, I ate the clams with freshly toasted French loaf dipped in a small serving of the juice.

For Dumpling, I prefer not to serve this to her typical vongole style (where it sits in the briny juice). But instead, I tossed the cooked pasta in a pan and on “high fire”, I poured in about 3 table spoons of the clam stock. I tossed it for a while longer to coat the pasta evenly and voila! 

This is definitely another crowd pleaser as it simply tastes amazing - it’s smooth because of the butter yet fragrant with the diced garlic and ginger. The wine adds on a lovely flavor to the whole dish too. Definitely something easy and doable for Christmas!

Disclaimer: I was invited to share my User Experience using Philips Avance XL Airfryer. All opinions and sharing I have given are mine and may differ from others. 

Cook with Air today! Quote Beanie N Us and buy the Viva Digital Airfryer at $399 (Usual price: $459), FREE $50 SHOPPING VOUCHER andAvance XL Airfryer at $479 (Usual price: $539), FREE $50 SHOPPING VOUCHER at the PHILIPS EXPERIENCE SHOWROOM. This promotion is valid from 1stDecember till 31st January 2014.

Limited to 1 Airfryer per person. IC must be produced.
PHILIPS EXPERIENCE SHOWROOM
Address: 620A Lorong 1 Toa Payoh Building TP4 Level 1 S(319762)
Tel: 6882 5800
Opening hours: Monday to Friday: 9.00 am – 7.00 pm Saturday: 9.00 am – 1.00 pm. Closed on Sundays and Public Holidays.

The Viva Digital Airfryer and Avance XL Airfryer are also available at regular prices in leading electronics stores, department stores and supermarkets island-wide.

If you have enjoyed this post, please follow me on my Facebook Page where I share my parenting thoughts, food photos (be prepared for tons of them!), early shout outs for giveaways and interact with you, my readers! You can also follow me on Pinterest and Instagram!

Monday, November 18, 2013

User Experience: Herb Roasted Chicken Drumsticks with Philips Avance XL AirFryer

I will be the first to own up that I am quite a dinosaur in the area of kitchen tools and aids. My 3-in-1 grill/oven/microwave has served me well for the past 7odd years and I have not gone around looking at new kitchen tools.


So I was a tad worried if I know how to use the Philips Avance XL Airfryer when I finally laid my hands on it. After opening it up and having a quick glance / look at the manual, my immediate thought was “So that’s it? Pop it in, set temperature and then the time?” LOL


Above: The Philips Avance XL Airfryer is a spunky looking kitchen tool with the stylish black and smooth lines. 

:: User Experience

Eating Healthy, the Air-fried way!
Being a noob at using this, I really wanted to try out a single meat item first. The entire concept of airfrying is truly exciting for me as eating healthier is definitely one of the things that I am concerned about when it comes to cooking for the family. Chicken is one of the regular items we cook at home so I decided to roast some drumsticks.


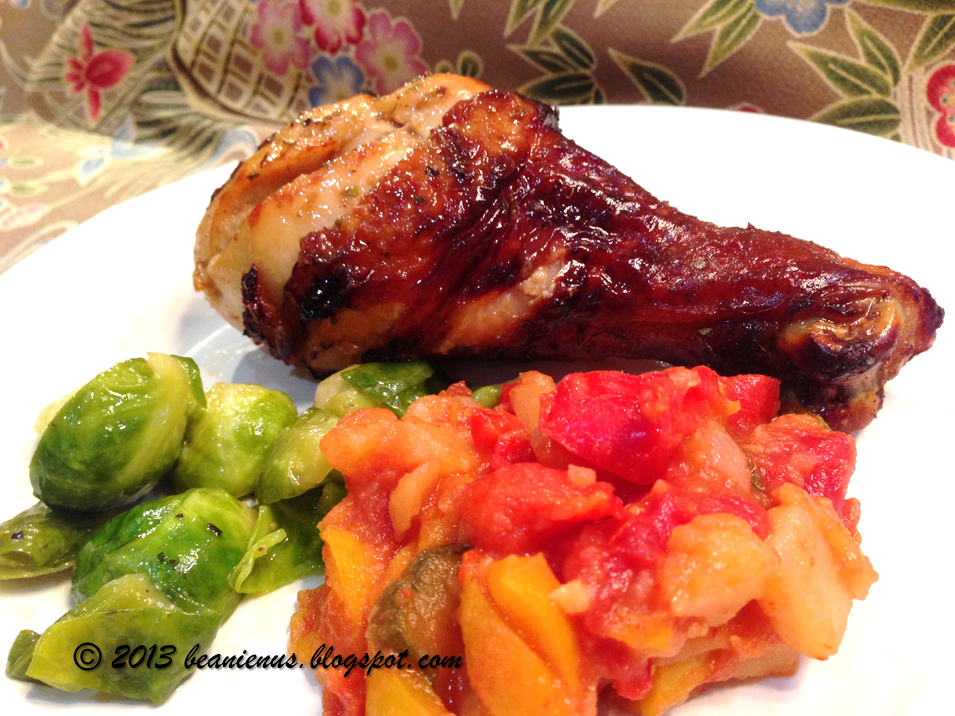
Here’s how they turned out:


Here’s a close up – can you see that there is no oil residue near / below the chicken pieces? I am certainly impressed at how healthy this cooking method is!


A quick look at the container below strainer shows very little oil. As I was lifting the pieces out of the strainer with a pair of tongs, I was pleased to hear the unmistakable crackling sound of a well-roasted chicken. The skin was crispy just like how it usually is when I use my oven.

Capacity
For this latest model, the Philips Avance XL Airfryer has 50% larger capacity. That worked beautifully for me as I could roast 4 drumsticks all at one go – perfect for my family size! This saves me much time as compared to having to roast them in 2 batches!

:: The taste test
Because we had marinated the chicken pieces for about 6 hours so the meat was flavorful. When it comes to cooking, I very rarely deep fry our dishes because I believe in healthy eating and I do not like it when the meat is too dry.

However, this was not the case with the Philips Avance XL Airfryer – check out how my chicken drumsticks turned out!


The meat was still flavourful yet still moist. An additional plus point which I like about using the Philips Avance XL Airfryer is that unlike deep frying where the herbs may float off, the herbs which I use for marinating stay on the chicken. This ensures that the taste from the herbs stays locked in. J   

Now, are you keen to try out my herb roasted chicken drumsticks? Here’s the recipe to share!

:: The Gathering List
1.  4 chicken drumsticks
2. Dried Mixed Herbs
3. 1 teaspoon of Chili Powder
4. 1 teaspoon Garlic Salt
5. Grounded Black Pepper
6. Lemon Juice
All of the items listed from 2 to 5 are from McCormicks

Optional: Red Wine Marinade


:: The Cookout 
1. Rub in Lemon Juice (I use around 2 teaspoons) and 2 table spoons of Red Wine Marinade
2. Sprinkle and rub garlic salt and a few dashes of black pepper to the chicken
3. Add a few dashes of herbs (according to taste)
4. Leave to marinade for at least 1 hour
5. Pre-heat fryer to 180◦ for about 5 mins
6. Add drumsticks to the basket
7. Roast on 200◦ for the first 10 mins and then 180◦ on another 5 

Served hot!


Disclaimer: I was invited to share my User Experience using Philips Avance XL Airfryer. All opinions and sharing I have given are mine and may differ from others. 

Cook with Air today! Quote Beanie N Us  and buy the Viva Digital Airfryer at $399 (Usual price: $459), FREE $50 SHOPPING VOUCHER andAvance XL Airfryer at $479 (Usual price: $539), FREE $50 SHOPPING VOUCHER at the PHILIPS EXPERIENCE SHOWROOM. This promotion is valid from 1stDecember till 31st January 2014.

Limited to 1 Airfryer per person. IC must be produced.
PHILIPS EXPERIENCE SHOWROOM
Address: 620A Lorong 1 Toa Payoh Building TP4 Level 1 S(319762)
Tel: 6882 5800
Opening hours: Monday to Friday: 9.00 am – 7.00 pm Saturday: 9.00 am – 1.00 pm. Closed on Sundays and Public Holidays.


The Viva Digital Airfryer and Avance XL Airfryer are also available at regular prices in leading electronics stores, department stores and supermarkets island-wide.

Related Posts Plugin for WordPress, Blogger...

Be warned: All content in this blog is copyright protected.

MyFreeCopyright.com Registered & Protected